Contact LisaLise

Please use the form on the right to contact LisaLise.

Majestic Court 5, St. Mary's Street
Mellieha
Malta

LisaLise offers online education of natural plant-based cosmetics via e-books and courses

LLBlogHEADER2020-3.gif

Shop Blog

A look inside the LisaLise natural cosmetics lab with free formulas, DIY how-to's, ingredients tips, sneak peeks, and more.

Filtering by Category: Botanicals

Almost Accidental Jasmine Enfleurage

Lise

Look what happened to be growing over the fence from my neighbour around the end of August. These beautifully fragrant jasmine flowers were picked the same day they flowered. I know because I had been eyeing (what I could see of the plant) with great interest.

This ‘haul’ of 10 blossoms was carefully spread out to dry in my lab. The next day, a new bunch showed up and was promptly plucked. This went on for a little more than a week (I stopped counting). I picked every blossom I could with a clear conscience as only a very small area of the plant had decided to grow near enough for me to reach.

The entire batch was a relatively modest amount (about 100 flowers in total), but the fragrance was quite powerful.

And as I brought them into the lab to dry, there were other lab things going on… like little swatches of freshly made balms undergoing a bit of scrutiny.

The Enfleurage Urge

It has long been one of my desires to learn proper enfleurage. I’ve read a bit about it and listen with great interest to those who practice it and are willing to share their wisdom and experience with me.

Enfleurage originated in France in the 1700’s and is a perfuming technique used to capture the scents of plants that are otherwise hard to capture by distillation or maceration. There are several different enfleurage methods that can be employed. One method calls for freshly picked blossoms being placed ‘face down’ on – or very near – a thin layer of neutral smelling fats in a special container/tray. They then ‘breathe’ their fragrance molecules onto the fat layer. Blossoms are replaced regularly until the fat is satisfactorily fragrant.

With this method in mind, a couple of balm swatches became impromptu fat layers for some jasmine flowers.

Guess what?

Even without the correct equipment, the scent transferred beautifully.

To be sure my own nose wasn’t playing tricks on me, I brought one of the balm swatches (sans flowers) to my husband and asked him what he thought it smelled like. He immediately said jasmine (wrinkling his nose a bit as he doesn’t much like jasmine).

Doing proper enfleurage just got bumped up my to-do list.

Do Tell

Have you ever tried enfleurage? Which flowers and method did you use?

More Enfleurage Stuff

The inspirational Jade Forest on Enfleurage (LINK)

My interview with Jade (Jade Grows her Own Perfume) on this blog

A previous enfleurage attempt using lilacs in coconut oil (LINK)

Want to make your own balms? Below is my ebook about natural balms. Click the picture to learn more about what’s included.

Rose-Infused Oil With the Cold Infusion Method

Lise

Today, I'm going to show you how I make cold-infused rose oil. And if you decide to make your own, I'll show you how to use the leftovers to make another product in an upcoming post.

Are you a little excited?

Excellent!

Let's get busy!

The Rose Quest

Apart from being a major fan of rose hydrosol, essential oil, powder, wax, and every other imaginable kind of rose I can get my hands on, I have also experimented with infusing rose into different fixed/carrier oils for quite some time.

Powder, dried petals, and dried buds of different types from a variety of different suppliers around the globe have made their way into my infusion jars.

The reason is simple.

I've been on a quest to

  • find which precise combination of oil and rose type produce the most fragrance

  • find optimal infusion time

This is admittedly a self-appointed 'against-all-odds' kind of a challenge. A cold oil infusion with rose doesn't generally produce much in the way of scent.

But, on occasion I have produced a very discernible and pleasant fragrance. And every good result has inspired me to continue and try to optimise even further.

So here are a few of my best cold infusion tips.

Infusing Oil with Dried Rose: Optimising the Fragrance

The solution is deceptively simple: use quality raw materials from start to finish. There is, of course, a hard part or this wouldn't have been an ongoing quest.

The hard part is finding the roses.

Now, I know there are a lot of suppliers who deliver top quality, but there's an additional factor.

Even though we are infusing dried material, we are looking for the freshest (read: most freshly-harvested) and most recently dried material. And that's the hard part, because the really fragrant rose types have a short season.

Therefore, if you are not growing, processing, and drying your own roses, your best bet is to source from producers of the raw material.

In my experience, many producers of dried roses also happen to be distillers of hydrosols and essential oils. Look for a company that specialises in rose products. Not only are they the folks who will be able to deliver the goods, but they are also passionate about what they do and therefore knowledgeable about the material.

Which roses are the most fragrant?

  • Rosa damascena (damask roses)

  • Rosa Centifolia (cabbage roses)

You could in principle use any roses you choose, but if fragrance is your goal, look to these first.

That said, I've also had some pretty good results with dogwood roses/wild roses (rosa canina) when I have had occasion to forage and dry them myself.

Which Oil to Use

As for oils, there are numerous possibilities that will provide a good result, but as a general guideline choose an oil that has

  • Long shelf life

  • Neutral scent

  • Function you like, want, and need

  • Skin feel you like, want, and need

There are several oils that fit this category. My personal faves are

  • Sweet Almond oil

  • Apricot Kernel Oil

  • Jojoba

  • Fractionated Coconut Oil*

  • Castor Oil

*this oil has no nutrients to offer in the way of skincare, but does have a very long shelf life and is quite forgiving to work with

Feel free to use any oil you prefer, but if you are on a fragrance-capturing quest, start with something from the list above.

So, now that you have sourced your dried roses and chosen your oil, you're ready to get busy infusing!

Here is the formula:

LisaLise's Rose Infused Oil

Ingredient Percent
Oil of Choice 84.5
Dried Rose 15.0
Vitamin E Antioxidant 0.5

Method

Choose a container size that fits with your batch to avoid too much 'air headroom' in the jar.

  1. Weigh ingredients

  2. Place ingredients in a sanitised container

  3. Place lid on container and label with date and contents

  4. Allow to infuse for 4-8 weeks at room temperature. Place the container where the temperature does not fluctuate very much. Some prefer placing a cloth of some type over the container.

  5. Agitate the container daily (and tell it how pretty it is to make it feel good)

  6. Strain through tightly woven cloth (muslin or layers of cheesecloth)

Pictured above: organic sweet almond oil infused with rose. That golden color came about after 6 weeks of careful pampering (read: daily agitation and whispering sweet nothings at the infusion in progress).

Coming Up

Next time we get busy with rose, we'll use the leftovers from the infusion to make a brand new product.

Do Tell

Have you been successful capturing the scent of roses in an oil infusion? Please feel free to drop a comment below!

Want more oil infusion fun? The book below shows you how to make oil infusions with the heated method (as well as how to make your own stunning balms). Click the picture to read more.

Herbal Tea: Health and Skincare Inside and Out

Lise

Throughout this summer, I have been enjoying herbal tea as a refreshing all-day cool drink. Almost every herbal tea functions equally well hot or cold. Come to think of it, I can’t recall a single herbal brew I didn’t enjoy equally as an iced tea.

This particular blend has been my go-to during the past months. I happened to serve up a glass to a family member who popped by on a very hot day and it was instant hit. When I offered her some to bring home, the reply was “I thought you’d never ask”.

If you happen to work with botanicals and have a selection of dried herbs in stock, it’s pretty easy to make your own herbal blends. The advantages are multiple as you are getting the (water-soluble) benefits of the botanicals as you enjoy your refreshing drink.

I’ve made quite a few blends over the years and have discovered there are a few things you can do to take your creations to the next level.

Today, I’m sharing a few tips that have worked for me. You might already know some of these, but hopefully there is a bit of inspiration too.

How to Make Your Own Herbal Tea Blends

In my experience, composing an herbal tea is a bit reminiscent of creating a fragrance blend. If you compose a blend of only top notes, it’s going to lack depth and ‘roundness’.

It can make quite a difference to the taste (and herb synergy) if you choose a few ‘background’ herbs to function a bit like a taste-and-fragrance anchor. These may be (super beneficial) herbs that may seem a little boring-tasting on their own, or could be herbs you normally wouldn’t consider using in a blend at all. (Can you tell I’ve experimented quite a bit over the years?)

As an example, here’s are some of the ‘background herbs’ I am using in my current blend

  • Horsetail

  • Red Clover

The ‘middle and top note’ herbs

  • Lemon verbena

  • Wild rose

  • Hibiscus

  • Chamomile

  • Rose

Choosing Proportions

I am very instinctive when making herbal tea blends. Nothing is weighed or measured, but merely mixed into a large bowl in proportions that suit me at that moment. Herbs are chosen from my stock ‘instinctively’ as well. Gazing into the stock cupboard is inspirational for me as I have quite a collection of dried botanicals.

If this sounds a little daunting and you haven’t tried this before, may I suggest using about 1/3 of the blend as ‘background herbs’ and 2/3 with the herbs you want to be dominant in taste.

In the blend above, I am using a proportionately larger amount of chamomile and rose petals as I like these to stand out. The lemon verbena gives these dominant ‘flowery herbs’ a bit of crispness and depth. Hibiscus was added after my first few batches because I wanted a pinker brew. It also adds to the experience if the color of the brew matches the taste.

How to Make an All Day Herbal Brew

To have enough to sip on all day (and serve to lovely guests who happen to pop by), make a potful (I make 1 liter) at a time.

  1. Fill a large tea filter with your chosen amount of herb blend (I generally use about 5-8 grams)

  2. Pour boiling water over the herbs and allow to infuse. While most herbal brews generally take between 5-10 minutes to infuse, I usually infuse between 15-20 minutes.

  3. Sweeten if desired (I generally add a spoon/dipper of raw honey)

  4. Drink some immediately and/or allow to cool and serve over ice with a slice of lemon.

And if you want to get a little fancy, serve up in a stemmed glass.

Enjoy!

Bellow is my latest publication that shows you how to compose your own bi-phase cleansers and make-up removers.

Hibiscus - a Hidden Treasure

Lise

Apart from functioning as the most amazing eye candy, this basket of beautiful hibiscus flowers is useful for so many things, I hardly know where to start.

Hibiscus comes in a range of colors – and they all have something to offer in the way of both health and beauty. The pictured flowers have the botanical name Hibiscus rosa-sinensis which come in a range of shades – from baby pink to the classic deep red so many of us are familiar with as an ingredient for tea.

I had the opportunity to pick these fresh and because the flowers are quite a bit larger than I am used to, I included my hand when I snapped this photo so you could get an idea of the size.

I’m going to be drying these and using them in a cleanser but may also try a small batch of infusion as well.

Hibiscus Has a Lot to Offer

Hibiscus has a long tradition of medicinal as well as skincare uses. It’s not surprising as they are packed with beneficial constituents.

From Review on Hibiscus rosa-sinensis flowers:

The phytochemical analysis showed that Hibiscus rosa-sinensis contained tannins, anthraquinones, quinines, phenols, flavanoides, alkaloids, terpenoids, saponins, cardiac glycosides, protein, free amino acids, mucilage, essential oils and steroids.

Chemical constituents, pharmacological effects and therapeutic importance of Hibiscus rosa-sinensis - A review lists these impressive properties

antidiabetic, fibrinolytic*, hypolipidemic, antioxidant, antiinflammatory, antipyretic, analgesic, immuno-modulatory, anticonvulsant, antidepressant, memory enhancement, cytotoxic, antimicrobial, antiparasitic, dermatological, anti-haemolytic, urinary, hepatoprotective, neuroprotective, antitussive and many other effects.

I added the asterisk at fibrinolytic because I wasn’t familiar with this word. Fibrinolytic means ‘manages, treats and prevents bloodclots.’

I’ve added a few more links below if you want to get busy researching this hidden health and beauty treasure.

Meantime, I’m waiting patiently for this small batch of petals to dry fully so I can turn them into a powder to add to my next self preserving honey cleanser.

Want to make your own hibiscus powder? There’s a post that shows you how (featuring purple hibiscus) right here. And if you’re curious as to which grinder I use, it’s pictured here.

More About Hibiscus

An update review on hibiscus rosa-sinensis phytochemistry and medicinal uses (LINK- PDF download)

Components in aqueous Hibiscus rosa-sinensis flower extract inhibit in vitro melanoma cell growth (LINK)

TIP: I’m planning on using my hibiscus powder in a self preserving cleanser. The book below shows you how to make your own.

What Makes Colloidal Oatmeal Colloidal?

Lise

This post is the result of numerous extensive research sessions that turned up differing answers, more questions, and a whole lot of interesting information about microns and particle sizes for colloidal oatmeal.

Who could imagine a simple grain could be such a mind-blowing skincare ingredient?

But I'm getting ahead of myself.

Get ready for a bit of a ride as we examine colloidal oatmeal, because there are a few twists and turns along the way.

The Discussion

It was discussion with some colleagues about the production process for making colloidal oatmeal that started this whole thing. Some of the participants were convinced colloidal oatmeal could only be produced via a process that entails boiling the grains in water, drying, and subsequent filtering. Others were convinced making colloidal oatmeal was merely a matter of grinding/milling oats to a certain particle size.

Spoiler alert: Everyone was right.

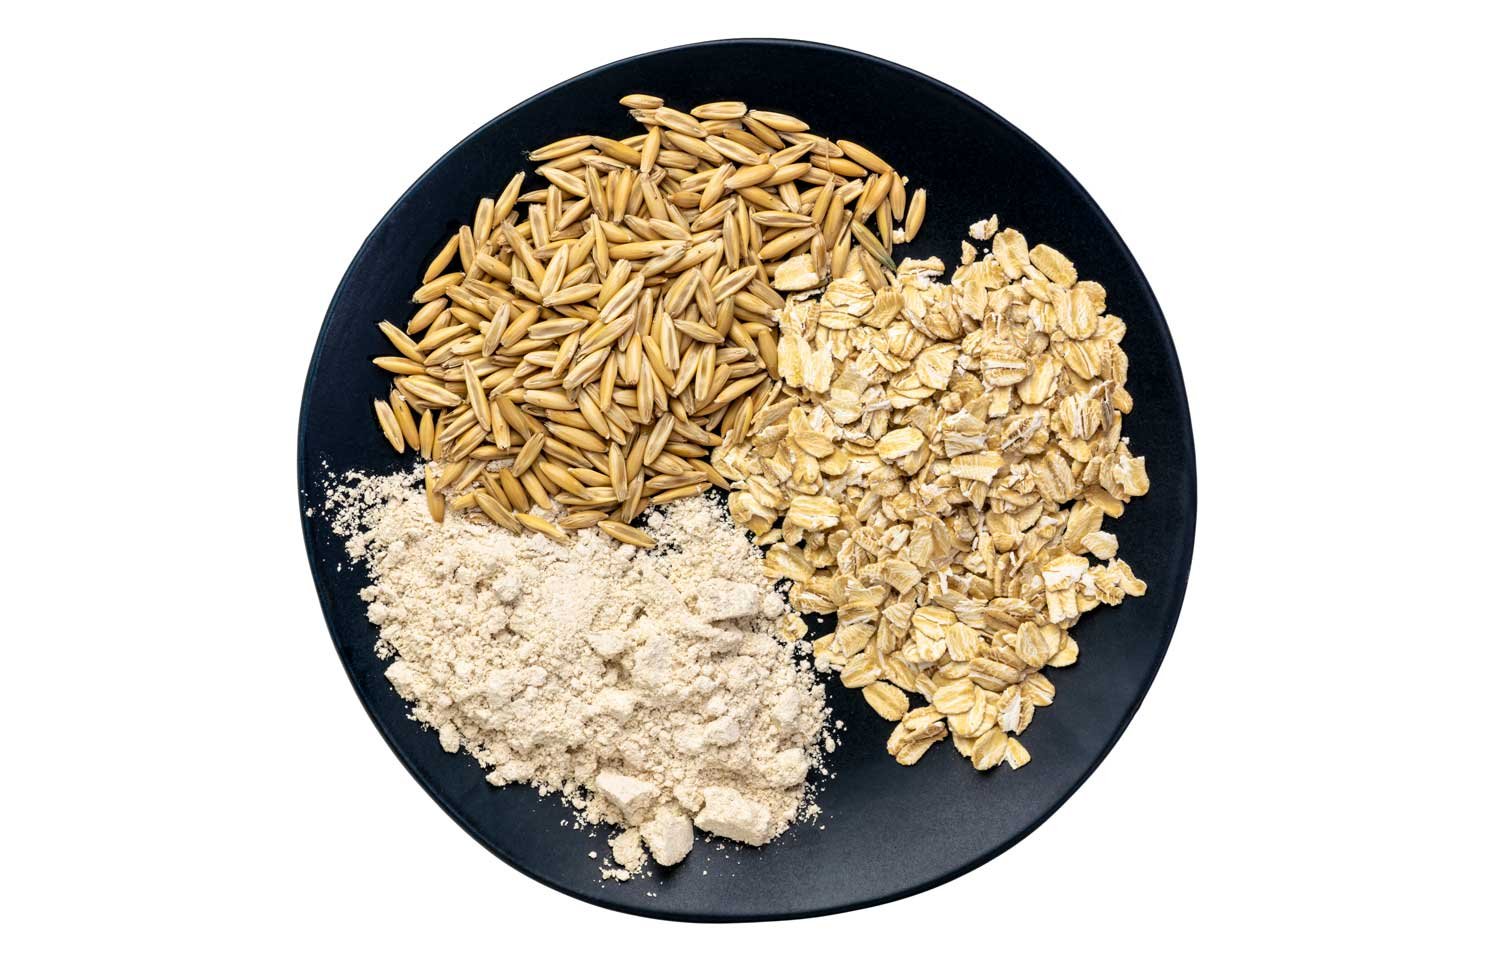
But before we get into the process of how colloidal oatmeal is made, we need to take a peek at the difference between colloidal oatmeal, ground oats, and oat flour.

Colloidal Oatmeal vs Ground Oats vs Oat Flour

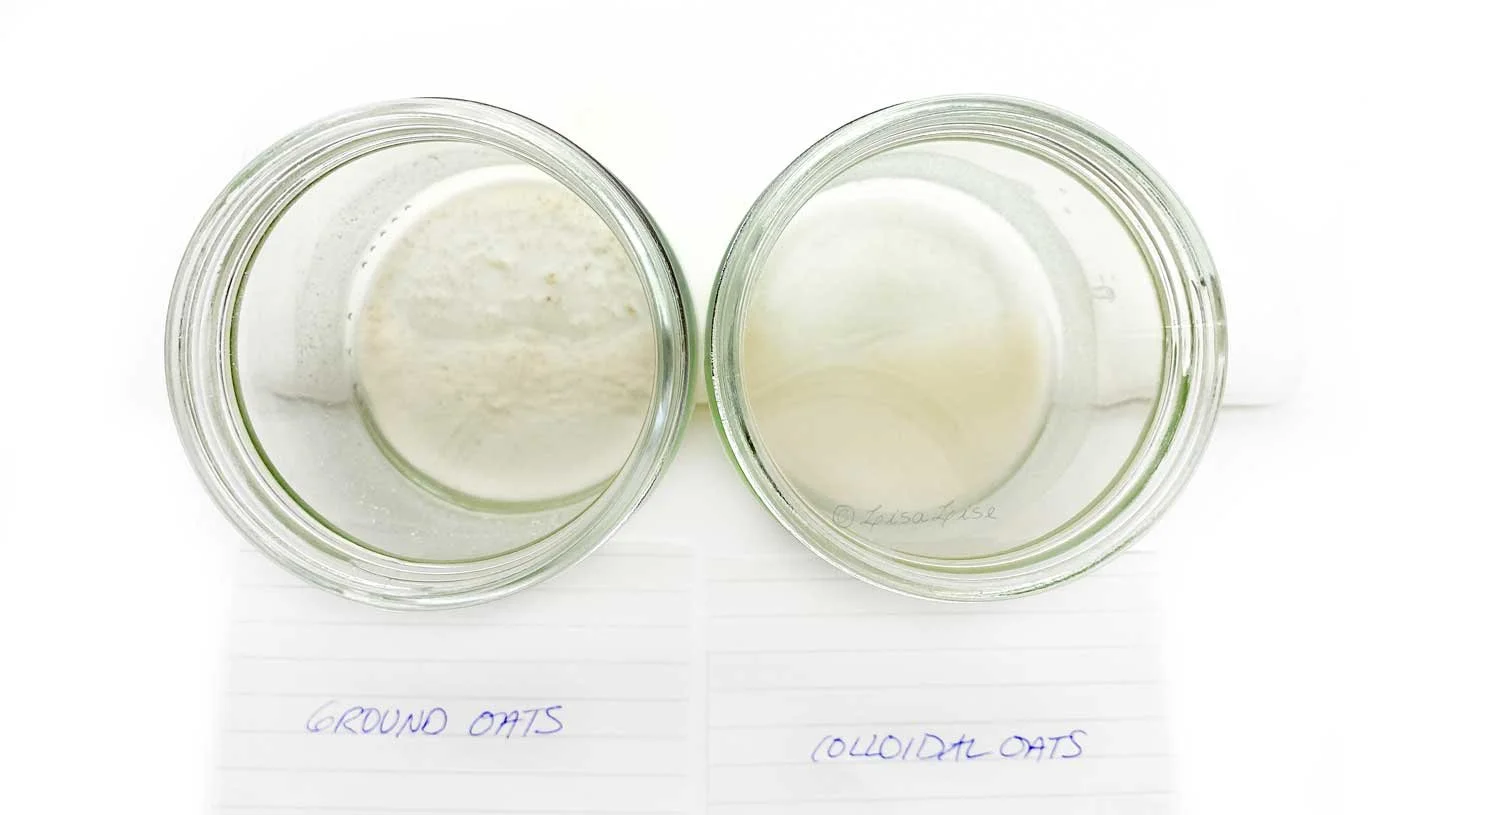
If you grind up a portion of rolled oats (what I show you how to do on this post), your result (unsurprisingly) will be ground oats. A coffee grinder and lots of sifting will get you a fine, powdery result that's great to use as an ingredient, but even loads of sifting and grinding won't get the particle size down far enough to where you can call it colloidal oatmeal.

Go ahead and add your handcrafted ground oats to a powdered facial cleanser, face mask, or soap, but if you incorporate it into an emulsion (say, a lotion), it will in all likelihood result in undesirable lumpy bits that you won't be happy about applying to your skin.

In short: when it comes to texture, ground oats have more limited uses than colloidal oatmeal.

How Oatmeal is Processed

Colloidal oatmeal is made using whole oats and includes the bran, but has a smaller particle size than can be achieved in a home setting (more on that in a minute).

Oat flour is made by first removing the bran and then the milling the oats. By removing the bran, it's possible to achieve a much finer particle size. This is great if you want to add a bit of texturizer to your product, but inconsequential if you want all the documented skin-loving properties that colloidal oatmeal offers.

Without the bran, oats really don't have very much to offer.

So, What's in Oat Bran?

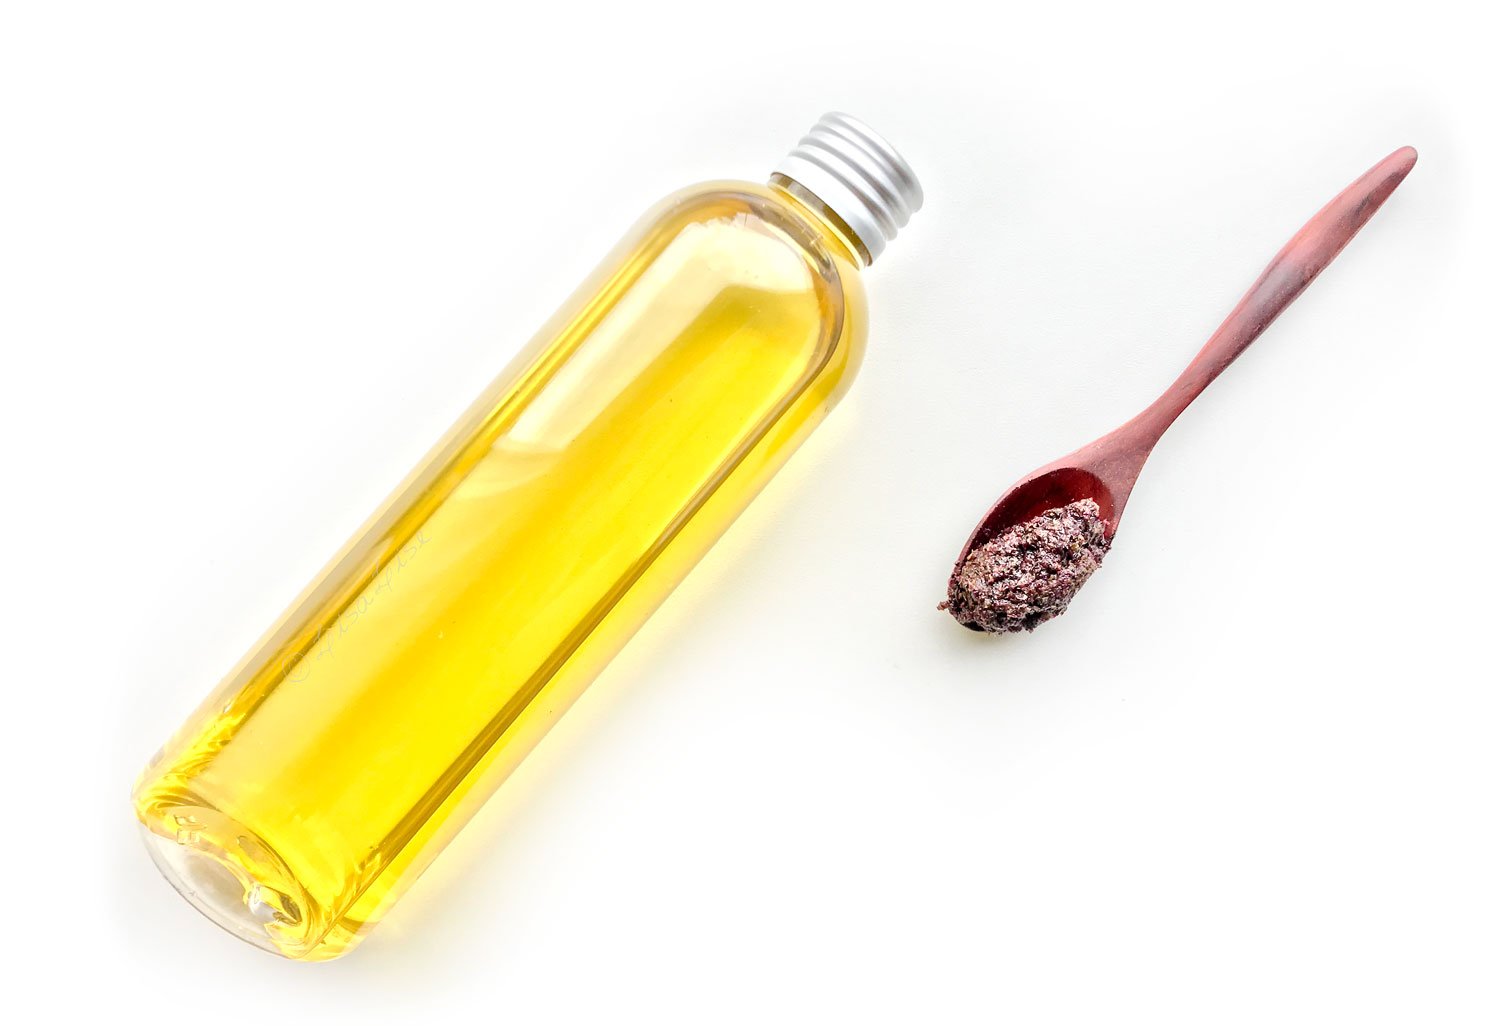
Colloidal oatmeal and ground oatmeal (from whole oats) both include the bran and therefore contain actives such as:

  • Lipids (unsaturated triglycerides that help replenish the skins oils)

  • Beta glucan (moisturising)

  • Avenanthramides (antioxidant unique to oats)

Oatmeal with the bran is anti-inflammatory, helps soothe itchiness, and even offers skin barrier repair.

As oats also contain a small percentage of saponins, they're ideal for gentle cleansing.

The bran is – quite simply – where all the actives are.

Colloidal Oatmeal Confusion

Now that we know the difference between oat flour, colloidal oatmeal, and ground oats, one would think there was nothing more to discuss (or research).

One would think.

But while I was researching colloidal oatmeal, I kept running into this:

The INCI name for colloidal oatmeal is: Avena Sativa (oat) kernel flour

The INCI name for oat flour is: Avena Sativa (oat) kernel flour

Do you see any difference in these INCI names?

I sure don't.

It seems you can't be quite sure of whether or not you are purchasing oat flour or colloidal oatmeal just by looking at the INCI name.

Obviously, more research was in order.

The International Cosmetic Ingredient Dictionary and Handbook defines colloidal oatmeal as “finely ground oatmeal”. The definition does not specify which species of oat is needed/desired/required.

I checked a few places to see what they had to say about colloidal oatmeal. Here are some highlights:

CosmeticsInfo.com writes:

Colloidal Oatmeal is finely ground oatmeal. It is often used to relieve minor skin irritation and itching due to poison ivy or insect bites. It can also be used as a soak, compress or wet dressing. When oatmeal is used in cosmetic and personal care products (rather than OTC skin protectant drug products), it may be called Avena Sativa (Oat) Kernel / Meal.

Oat Cosmetics writes:

Colloidal oatmeal is a natural cosmetic ingredient obtained from Avena sativa (oats). The whole oat grain, including the bran layer, is milled and sieved. This results in a light cream coloured, fine powder. The bran layer of the oat contains a high proportion of natural actives including, oat beta-glucan, avenanthramides, oil and protein, all of which are beneficial for cosmetic use on the skin.

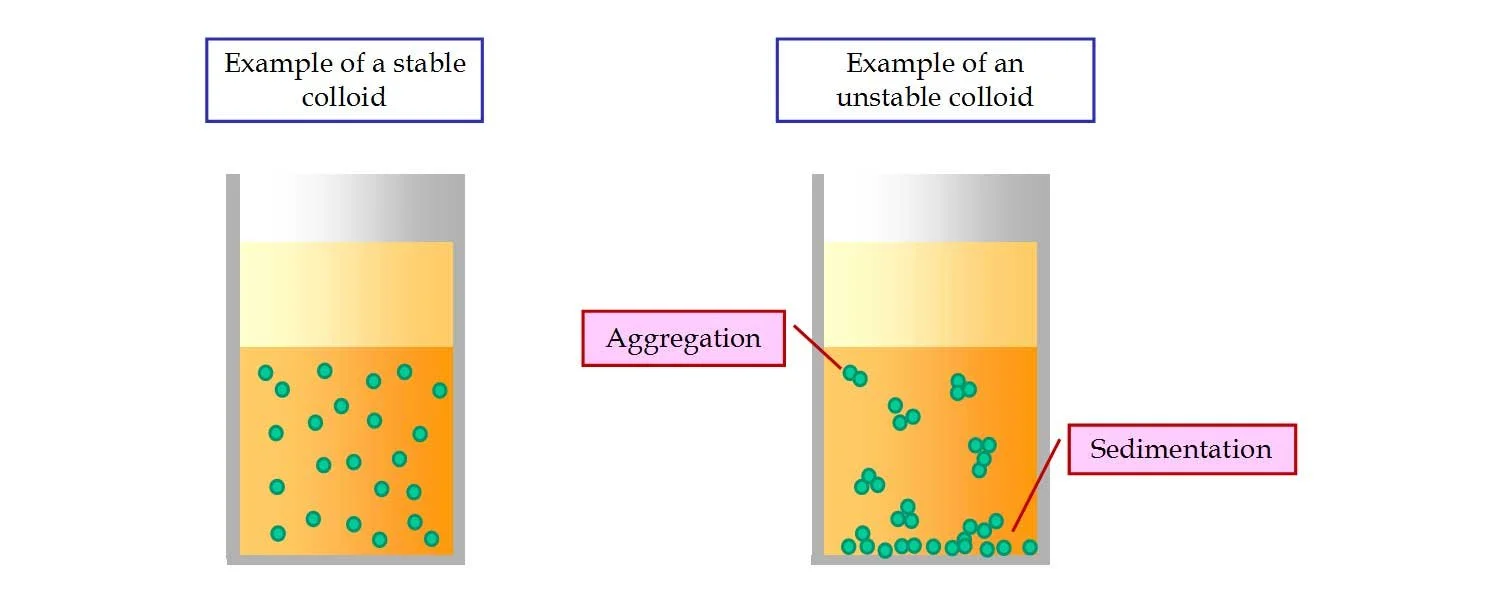
A ‘colloid’ or colloidal suspension is defined as a substance with dispersed insoluble particles suspended throughout.

Aroma Zone describes their colloidal oatmeal as such (Google translated from French):

This powder is called "colloidal" because the fineness of its particles allows it to form a homogeneous suspension in water, like milk, stable for some time.

Particle size: 44 microns

(note the micron mention - we're going to be looking at that in a tic)

I also emailed Formulator Sample Shop's founder Maggie Ghanem to ask if she could explain a bit about about colloidal oatmeal. She was kind enough to provide me with this:

Colloidal Oatmeal is made of finely milled oats from the Avena sativa plant. It consists of sugars, amino acids, lipids and fibers. Colloidal Oats are grounded, boiled and steamed. Oat grains are milled into fine powder that will produce a cosmetic agent that can be used as an addition to baths, powders, and moisturizing creams.

All in all, there's some great information here, but the mention of microns and particle size raised more questions.

We need to get a teensy bit nerdy now, but stick with me and I'll try to make it as entertaining as possible.

Microns, Nanometers, and Colloids

Pictured: the difference between a stable and unstable colloid.

The upper limit size for particles in a colloid is generally defined at 1000 nanometers. That means, each of those little green particles you in the illustration above should be under 1000 nanometers in size.

1000 nanometers is equal to 1 micrometer - commonly called a micron.

How tiny is a micron?

Well, 15 microns is the same as 0.015 mm in size (that's 1.5 hundredths of a millimeter).

Now, remember Aroma Zones product description above? It mentions a particle size of 44 microns. That is the same as a particle size of 0.04 mm (read: four hundredths of a millimeter).

Colloidal Oatmeal Particle Sizes

Now let's look at the particle sizes of colloidal oatmeal, which consists of about 20% starch particles and 80% oat-y particles.

The starch particle size is between 10 - 25 microns.

The oat-y particle size is described as 'below 75 microns'.

I know you're seeing this too.

Something doesn't fit.

The particles in colloidal oatmeal are massive! They have a diameter well above 1000 nanometers.

Colloidal oatmeal particles are too big to be classified as a colloid.

If you want to get completely and utterly technical, colloidal oatmeal isn't even colloidal.

This was pretty much my reaction to this information.

But, instead of panicking (as would be quite understandable), I decided to keep digging around and asking more questions.

And there was still the matter of production processes – which method was correct?

Finally, with the help of a very patient and gracious expert in the production of colloidal oatmeal, I found the answer (he has a special mention at the bottom of this post).

Production Processes for Colloidal Oatmeal

The Dry Way: If you have the right equipment (and no, we're not talking about a pricey super duper kitchen machine), it is indeed possible to dry-produce colloidal oatmeal. The main challenge is the natural fat content of oats (about 7%) which tends to gunk up the 75 micron sieve it has to pass through, but as long as at least 80% of the oats pass through the sieve, it's OK to label the packet 'colloidal oatmeal'. Granted, this method takes some real advanced milling equipment that not many have, but it is indeed do-able.

The Wet Way: Producers who employ 'the wet way' of making colloidal oatmeal will use a process called pre-solubilising the oat starch. This means they soak the oats (and do other magic secret proprietary things) to separate the oaty bits from the starchy bits. This process changes the structure of the starch and allows the producer to achieve an acceptable colloidal oatmeal particle size.

So, it turned out that everyone in the discussion was right.

Don't you just love it when that happens?

But wait!

There is still an unanswered question.

The INCI Conundrum

Since the INCI name is identical on both oat flour and colloidal oatmeal, how can we tell if we are buying colloidal oatmeal or oat flour?

Here's the kicker.

I don't have the answer (and still don't since this post went live in 2017!)

I can only offer this advice: buy from a trusted supplier and ask them. Be kind, but be persistent until you get a satisfactory answer. Be patient. It could take a few weeks, because sometimes the distributor (not being the producer) won't be able to answer you until they do a bit of digging and asking on their own first.

Meantime you will get the bran's skin benefits using your own handcrafted ground oats in any of the following products without having to worry about lumpiness:

  • Bath bombs

  • Powdered face cleansers

  • Bath salt blends

  • Face (or hand) masks

To illustrate the difference between ground oats and colloidal oatmeal I placed 1 gram of each in separate containers, then added 15 grams of water to each container. I swished the jars to disperse the oats and then let the jars stand untouched for about 15 minutes. Here is the result. It’s easy to imagine why a cream or lotion would get a bit lumpy if handcrafted ground oats are added instead of colloidal oatmeal.

Do Tell

Do you use colloidal oatmeal, ground oats or oat flour in your products?

More About Colloids, Avenathramide, and Oatmeal for Skincare

Colloidal oatmeal; history chemistry and clinical properties (LINK)

What is a colloidal oatmeal: Cosmetics Business (LINK)

Anti inflammatory activities of colloidal oatmeal (LINK)

Colloidal oatmeal formulations as adjunct treatments in atopic dermatitis (LINK)

Cosmetics and Toiletries: Colloidal Oat flour for skin and hair (LINK)

Colloidal Oatmeal: history, chemistry and clinical properties (LINK)

Safety Assessment of Oat derived ingredients as used in Cosmetics (LINK)

Scientific American: Creating your own colloid (LINK)

Avenanthramides (LINK)

Biological Activities, Health Benefits, and Therapeutic Properties of Avenanthramides: From Skin protections prevention and treatment of cerebrovascular diseases (LINK)

Particle Size: Wikipedia (LINK)

Micrometer Conversion scale (LINK)

A very special thanks to Cark Maunsell at Oat Services for his kind assistance and patience with all of my questions.

Want to make a quick and easy cleanser with oatmeal? The formula below (from the Working with Shea Butter book) might be fun to try.

Using Dried Lavender - All of It

Lise

What you see pictured above is a bunch of dried lavender stalks on one of my work trays.

I made a lavender hydrosol recently and used mostly fresh lavender buds, but also some of the stalks for the distillation. Because I had more stalks than there was room for in the still, I bunched up the remainder with a bit of string and hung them up to dry. Yes, just the stalks.

Not too many years ago, I would have thought nothing of tossing them, but no more.

Why?

Because lavender stalks contain loads of lovely lavender properties and can be used for numerous things. Today, I’m sharing a few things lavender stalks can be used for.

Fresh Lavender Stalks - The Fragrant Trail

If you grow and use your own lavender, you may have an ample supply of stalks after harvesting - maybe even enough to spread around.

A friend of mine saves her freshly cut stalks and strews layers of them in strategic spots in her garden - particularly along her most used pathways. Her reasoning: “I get a lovely lavender fragrance wafting up every time I walk on the stalks”.

Uses for Dried Lavender Stalks

  1. I’m sure you’ve noticed the scissors and cut bits on the tray pictured above. These beautifully fragrant bits could easily be popped into an oil of your choosing to make a fragrant lavender oil infusion to be used in a body oil, facial serum, lotion bar, traditional salt scrub or any other cosmetic.

  2. If you don’t want to make an oil infusion, you could do a dry infusion in sugar. Simply fill a jar 3/4 full with the sugar of your choosing, add cut lavender stalks and pop the lid on. Keep the jar in a cupboard and give it a shake regularly. You can leave the stalks in the sugar as long as you please and simply sift out what you want to use for baking or in a cup of tea. Keep refilling the jar with sugar as needed. (This infusion method works with other fragrant and edible botanicals as well. I have a vanilla sugar infusion that has been ongoing for years)

TIP: Cut stalks directly before infusing them to release (and capture into the medium you are using) as many of the fragrant components as possible.

Easy Sachet Bags

Finally, you could gather up the chopped/cut bits of lavender stalks and simply pop them into small organza or muslin bags to be used as cupboard or drawer fresheners.

That’s what I did with these.

Do Tell

Have you ever used dried lavender stalks for anything? Please share in a comment below.

Have you ever considered making your own oral care? Tooth powders are both easy to make and very effective!