Contact LisaLise

Please use the form on the right to contact LisaLise.

Majestic Court 5, St. Mary's Street
Mellieha
Malta

LisaLise offers online education of natural plant-based cosmetics via e-books and courses

LLBlogHEADER2020-3.gif

Shop Blog

A look inside the LisaLise natural cosmetics lab with free formulas, DIY how-to's, ingredients tips, sneak peeks, and more.

Filtering by Category: Extracts

Why Get Started Making Plant Extracts for Cosmetics

Lise

Learning how to make your own extracts for cosmetics is both super easy and at the same time not as easy as it might appear. The basics can quickly be outlined, but it takes dedicated practice to master.

I have been making all kinds of herbal extracts (specifically for cosmetics) for many years, but would still not call myself a master. Maybe I will in a few more years or so, but meantime, I am constantly learning and discovering new plant synergies, refining my methods and trying different raw materials.

In truth, learning how to make extracts of all kinds has proven to be as involved, multifaceted, and fascinating as learning how to formulate natural cosmetics.

All You Need is to Want To

While making extracts could be described as 'a journey with no end in sight', it really is easy to get started – it doesn't require much more than raw desire (and no special equipment is needed).

And it can't be dismissed that having the ability to compose and produce your own botanical extracts with confidence is truly empowering.

So where does one begin?

There are countless fabulous raw materials to work with - from botanicals to spices to fresh vegetables and fruits. There are numerous solvents to choose from: oil, vinegar, alcohol, glycerine, water – and it's even possible to combine solvents in different ways.

There is also an entire range of method options; from a simple infusion that is ready within an hour to an overnight slow-heat maceration to a several-step multi-medium process that takes weeks.

Which is best? Or most correct?

They might all be.

It depends entirely on what you want to achieve

  • an all natural colorant for your emulsion?

  • a powerful antioxidant for your face serum?

  • a natural fragrance for your balm?

  • a skin soothing addition to a shower gel?

All of these (and much much more) are possible with the right extract.

Can you see what I mean by a journey with no end in sight?

The Perfect Extract Starts in Your Mind (and Notebook)

Allow me to give you a tip about getting started: It's much easier to approach extract making if you know the intended end use before you start pulling out equipment and raw materials.

When you have a clear vision of what you expect your extract to do and (where you expect it to function), you will have laid the groundwork for which solvent, production method, and raw materials to focus on.

Example: a (water-soluble) glycerite is going to be a much better match for a skin mist than an anhydrous product that would require additional ingredients in order to be incorporated into the formulation.

Why Don’t You Tell me Everything?

One of the reasons I wrote the book Get Started Making Plant Extracts for your Cosmetics was to offer an overall introduction to the vast world of extract making - because it is truly an area where the possibilities are endless.

Not long ago, a customer wrote and asked me why there aren't there any specific amounts listed or detailed method instructions in the book.

It's a perfectly understandable question.

One would imagine it shouldn't be all that much effort to include an easy peasy guideline for each type of extract as the book includes a description of different solvents.

Here's what I replied:

"When it comes to making extracts (regardless of whether they are oil, water, vinegar, glycerine, alcohol or mixed medium), ingredient quantities are going to vary greatly and will always depend on which raw material (as well as the condition of the raw material), which solvent(s), and which extraction method or combination of methods is used. A 'general guideline' with listed amounts would have to include so many exceptions-to-the-rule that it would quite simply not be useful.

I am guessing it would take me a few years to write a comprehensive guide to extract making for cosmetics (and that probably wouldn't even cover everything)."

She wrote me back that she 'appreciated learning that there was more to this than meets the eye' and 'that's probably why so many of the things that you try on the internet turn out with mixed results'.

Explaining the complexities of extract making without making everything seem too arduous is a bit of a balancing act I still struggle with, because making extracts for cosmetics it is not difficult when you are confident about what you're doing. The best news? It doesn't take too terribly much effort to get to the point where you do feel confident.

Want to Get Started?

If you are an absolute beginner to extract making and want an overview, this e-book is for you.

If you want to get started with an overview as well as get busy making right away, this e-book bundle offer is for you.

Additionally, you will find specific listed amounts, calculation charts, and detailed information on the complete process of some different extract types in the books below.

I’d like to extend my kind gratitude to Lorena for inspiring me to write this article.

LisaLise Books With Specific Extract Formulations

The shampoo book has a section on making vinegar tinctures (that are used in the formulas in the book)

The book below has a section on making vinegar tinctures (used in the formulas in the book), and it’s also available in Spanish here

The bath book has a section on making aromatic powders (used in the formulas in the book)

The balm book has oil infusion and (some) glycerine infusion instruction for the formulas in the book

The glycerites book is a complete guideline to making glycerites

Footsie Tootsie Balm

Lise

Balms are often associated with cold and winter, but even in the heat of mid summer, a balm can be the best thing imaginable. This one has proven to be a fabulously foot-friendly product - perfect after a long day of holiday sightseeing.

After testing the blend of infused oils and macerated oils featured in this post, the ingredients proportions were tweaked ever so slightly and then made into this balm.

I can attest that it helps soothe my tired, achey and arthritic feet.

The working title of the original oil blend became the inspiration for the name of this product: Footsie Tootsie Balm.

Want to make your own balms? The book below can show you how.

Hair Rinse with Fresh Herbs

Lise

Here’s a peek at an infusion about to happen that is going to become a quick and easy hair rinse featuring a few fabulously fresh herbs. Nettle and horsetail are both great herbs for haircare, and the cleavers made its way into the pot because it just jumped straight up into my basket while I was out collecting herbs.

Working with fresh herbs this way is a real summer treat and easy to incorporate into a daily routine if you have access to fresh plants. Happily, I live near a park and also have generous neighbors with fabulous gardens.

These are so easy to make and can be varied according to which herbs you can source, what’s in season, and what you like!

Pick only what you need for a smallish pot of tea (about half a liter). If you don’t want to add preservative to the hair rinse, only make enough for a day or 2 and remember to store the liquid chilled.

Here’s how I made this hair rinse

  1. Place selected fresh botanicals in heat-tolerant container

  2. Pour freshly boiled water over the herbs

  3. Allow to steep for 10-20 minutes

  4. Strain

  5. Add a couple of tablespoons of apple cider vinegar

  6. Bottle

Use as a final rinse for the hair. Simply pour a generous amount through the hair after washing - or even without washing first.

Enjoy!

PS: a fresh herb hair rinse is a perfect after shampooing with your own solid shampoo bars. The book below shows you how to make your own.

Cherry and Hibiscus Vinegar Tincture

Lise

Combining botanicals for vinegar tinctures can make for some fabulous results.

This is a combination of dried organic cherries with hibiscus flowers. The result is a rich, luscious red color with a fragrance that has all but ‘disappeared’ the pungency of the vinegar.

I use vinegar tinctures (acetums) in numerous things: hair rinses, bath products, shampoo bars, and sometimes a tincture will even make its way into the kitchen to be drizzled over a salad.

This one did.

Do Tell

Do you make your own vinegar-based infusions? Which are your fave ingredients?

PS. The e-books below both have sections on making vinegar tinctures.

Another Self Preserving Honey Cleanser

Lise

I don’t believe I will ever grow tired of making these self preserving cleansers. The combination possibilities are quite literally only limited by ones imagination. And since these are my regular morning instant mask and cleanse, I do go through quite a few of them. I generally apply to hydrosol-misted face and neck a few minutes before entering the shower, then rinse off as the last thing before leaving the shower. This gives the ingredients maximum time to do their skin-loving magic.

Combining honey with glycerites and botanicals in the perfect proportions means they function as an excellent moisture boost and facial cleanser.

It’s hard to believe something like this could be so easy to make and offer so many ways of customisation.

The pictured cleanser is made with spirulina, chamomile, and rosehips powder. I used the formulation guideline in the Natural Cleansers book linked below.

Do Tell

Do you make your own honey cleansers? What are your favorite botanicals to add? Please feel free to share in a comment below.

Want to make your own self preserving glycerites too? Check the bundle offer below.

Lilac Sugar for Skincare

Lise

Today, we’re going to make a little something that only requires 2 ingredients: lilacs and sugar!

Although you could use this for baking (lilacs are edible), we’re going to be using our lilac sugar for skincare. But first things first.

Lilac Sugar, LisaLise Style

There are already many lilac sugar how-to’s on the net, but the ones I have seen all involve layering lilacs and sugar in a jar and then capping the jar and waiting for the fragrance to infuse.

My method is a bit different and dare I say, maybe even a bit faster. Are you ready to get busy? Great!

You’re going to need freshly picked lilacs (whichever color/fragrance you prefer - the fragrance does differ!). Pick your lilacs on a dry sunny day - they should not be rain-soaked.

Pluck some blossoms from your lilacs.

Note that the blossoms on the tray do not have any green bits. Getting the blossoms off of lilacs without the green bit takes a little bit of patience, but happily you don’t need loads and loads of blossoms to make this batch of lilac sugar.

What you see pictured above is pretty much the total amount of what I used.

Here’s my process

1. Place approximately a cupful of sugar in a bowl. (I used unbleached cane sugar)

2. Add the blossoms

3. With the back of a spoon (or similar), crush/press/squish the blossoms into the sugar. Keep breaking them up and working them into the sugar. The mixture is going to get a little moist during this process.

4. Spread the mixture on a baking paper lined tray

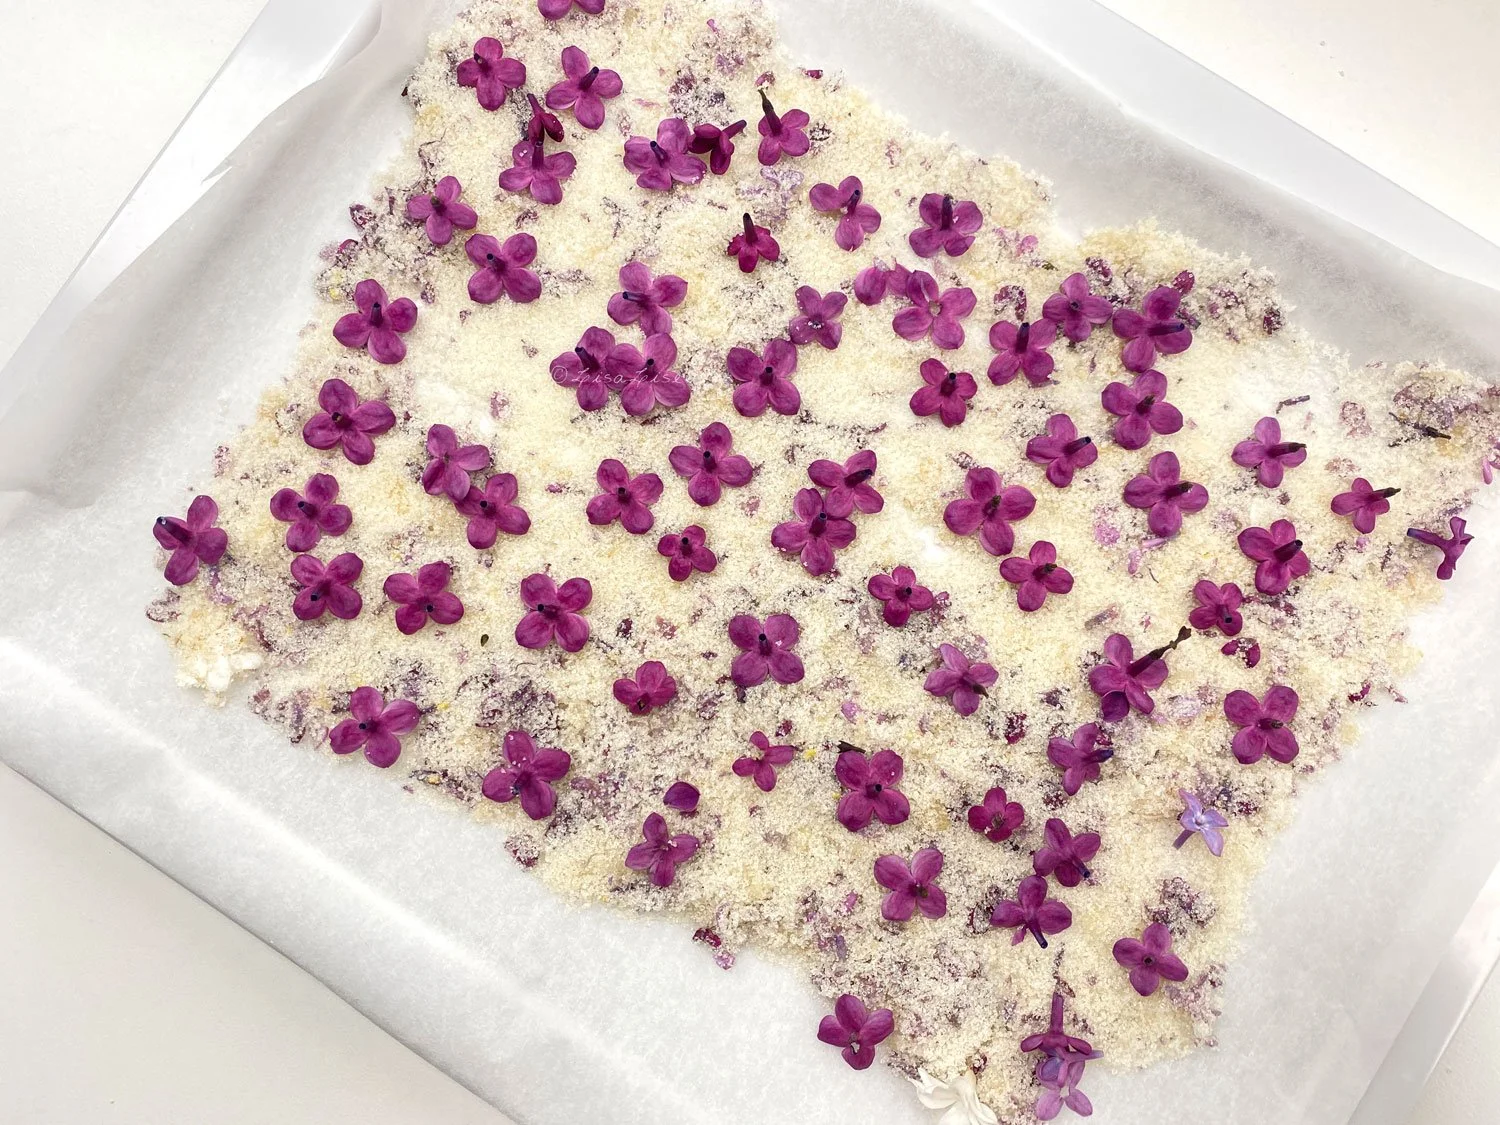
5. Place a layer of blossoms ‘face side down’ on the sugar. (If you’ve ever seen enfleurage in progress, then you know exactly where I got this idea from).

6. Cover the tray carefully with a loosely-woven cloth (I used a double layer of ‘European cheesecloth’ pictured below). This will keep the mixture free of unwanted dust etc and allow the blossom juice to evaporate and the sugar to dry out.

7. Allow the blossoms to dry completely (they will go darker and shrivel up as you see pictured above). It can be helpful during this time to stir (and break up) the mixture a few times. The layer of blossoms that were on top will get worked into the mixture.

8. When the mixture is completely dry (mine took 2 days), transfer the sugar to a jar and seal it.


If you want to set aside a few of the whole blossoms, then pick them out of the mixture before packaging the sugar.

Next up, we’re going to use this sugar in a lovely luxurious and easy to make skincare product!

Stay tuned!

Do Tell

Do you make your own lilac sugar? What’s your favorite method? Please feel free to share in a comment below.