Contact LisaLise

Please use the form on the right to contact LisaLise.

Majestic Court 5, St. Mary's Street
Mellieha
Malta

LisaLise offers online education of natural plant-based cosmetics via e-books and courses

LLBlogHEADER2020-3.gif

Shop Blog

A look inside the LisaLise natural cosmetics lab with free formulas, DIY how-to's, ingredients tips, sneak peeks, and more.

Filtering by Category: Skincare

How to Have Fabulous Feet Forever

Lise

A good friend asked me if I had any good foot care tips (which I did and shared with her). After having tried goodness knows how many methods for keeping feet looking and feeling great, I thought I’d share my own tried and true method with you today.

If you are struggling with thick skin build-up on your feet (otherwise known as 'cheese rind heels'), this method should be quite useful to you. Depending on how bad your feet are to begin with, this beauty treatment can cost you as little as the price of a brush to as much as the price of one foot-treatment plus one brush.

Start by Ditching The File

Despite what many may believe, foot files do more damage than good. The instrument functions by grating and tearing the surface of the skin which only makes things worse. Filing your feet only encourages an increased production of hardened skin (I have this on good authority from a couple of foot-treating pros). It doesn’t matter if you are using a fancy schmancy brand named tool, the function is the same: results that unfortunately only exacerbate the problem.

If your heels are really bad, start by getting the built-up, hardened skin removed by a professional. When that's done, you will be able to keep your heels smooth and supple with the following method.

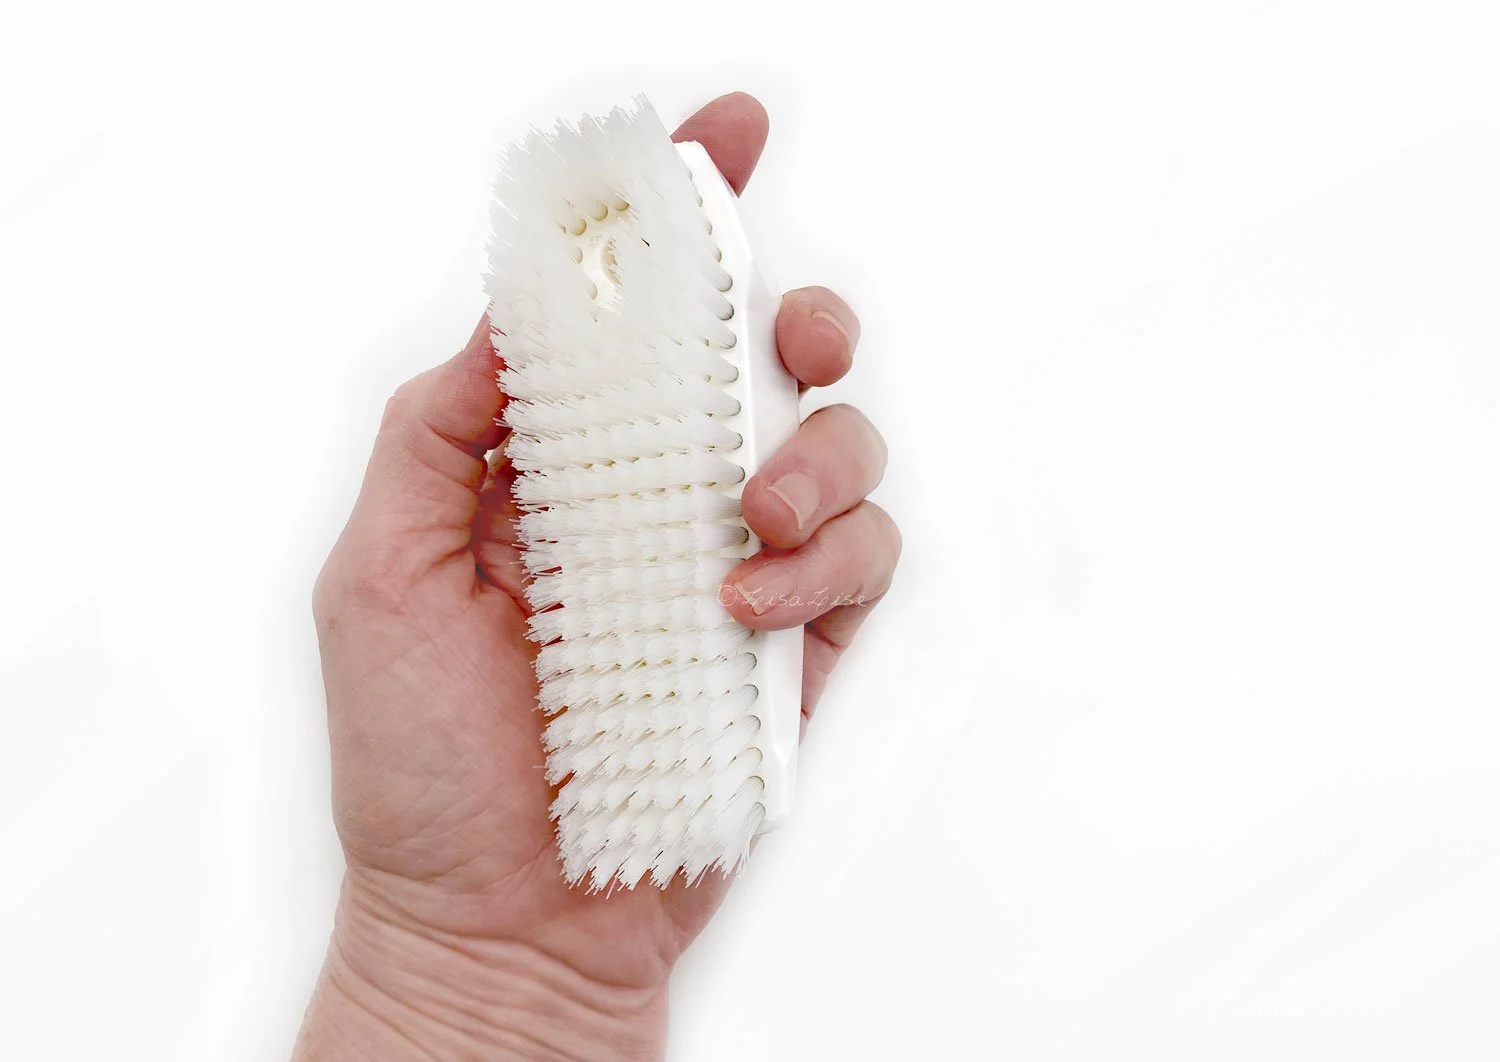
Brush Your Feet Daily

Get a brush that fits well in your hand with stiffish bristles (think nail brush). If you can get an oversized nail brush, that's ideal (see mine below).

After bathing/showering while the skin is still soft, brush your heels (and wherever else the hard skin build-up happens) vigorously for a minute or 2.

The stiff bristles of the brush will remove dead skin and the brushing will encourage circulation in the feet (which also keeps hard skin build-up at bay).

Don't forget the toenails – brushing lightly around the toes will keep the cuticles back and encourage circulation.

TIP: wash the brush regularly to keep it smelling sweet. (If you don't think this is necessary, try not washing your brush for a couple of weeks and then give it a sniff. Even if you don’t have a tendancy to get stinky feet, a brush full of dead skin cells starts to smell pretty awful pretty quickly.)

Then Soften

Finish your foot care routine by applying a body butter, cream or lotion to your feet. Give yourself ample time to apply and massage each foot to work the moisturiser in.

Then put on a pair of socks. Even if you plan on wearing sandals that day, 10-15 minutes with socks will allow time for the moisturiser to sink in.

All That Takes Way too Long!

If we don’t count the sock wearing time, this entire process only takes about 5-6 minutes in total: 2-3 minutes of vigorous brushing, 2-3 minutes of moisturising.

If you can make this little routine a daily habit, your feet will repay you in spades by looking and feeling fabulous – forever.

You’re welcome.

Do Tell

Do you have any foot care tips you swear by? Please share in a comment below

Activated Charcoal as a Skincare Ingredient

Lise

Cleansing with Charcoal?

It does sound like a bit of an oxymoron, doesn't it? How can applying a black substance cleanse anything at all?

Let's take a closer look at the ins and outs of activated charcoal.

One of the more recent buzzwords making the rounds in the beauty (and health) industry is 'detoxify'. It's understandable actually. We are all exposed to more than our fair share of unwanted chemicals via both air and water in most modern environments. And as a natural extension, our first line of defence - our skin - is going to take a bit of a beating.

That is where detoxifying comes in.

Imagine finding something we could use that just cleared away all of the toxins and unwanted chemicals.

The Good News

The good news: that something exists.

Activated charcoal has the (documented) ability to draw out and adsorb unwanted chemicals when taken internally.

And before I continue, let's just clarify the difference between absorb and adsorb.

ABsorb vs ADsorb

An item that absorbs integrates a substance into itself (kind of like a sponge takes up water).

An item that adsorbs attracts and keeps the substance exclusively on its surface area.

Activated charcoal is great at adsorbing because it is extremely porous (read: loads of surface area). (LINK)

The Less Good News

Now for the less good news: (some) science says activated charcoal may not be all that with topical use.

Instead of being able to give you a long list of links to dozens of studies proving activated charcoal clears up acne, brightens skin, helps heal wounds, and erases 20 years of wrinkles, it appears the jury is still out on how well activated charcoal works when applied topically. (some links below).

While researching this, I read many of the cons as well as the pros on activated charcoal's abilities with topical use and decided to share my conclusion with you.

Seeing as activated charcoal has been used for water purification, preservation and wound treatments (!) since ancient Egyptian times (link) , I am of the opinion that (some) modern science really needs to catch up with what history has already shown.

You: Lise, you're questioning science again

Me: Of course I am. Proper science welcomes questions.

In truth, it is up to every individual to decide whether or not activated charcoal works for them.

Now let's examine what this black substance comes from and what we can use it for in a cosmetics/personal care setting.

Activated Charcoal Production

Activated Charcoal is also called activated carbon. The raw material can come from various types of sources - from petroleum pitch to wood, coconut husk or even bamboo.

The activated charcoal you can purchase from many cosmetic ingredient suppliers is often from coconut.

To transform charcoal to activated charcoal, it is heated using a special process that results in increased porosity and adsorption capabilities. (read more about the process here)

It may come as a surprise to some that there are different processes to producing activated charcoal and it is available in different shapes, with different pore structures, and even with different purities (LINK)

A gram of activated charcoal can have a specific surface area (SSA) ranging from 500 m2 to 3,000 m2. The higher the number, the better the adsorption. (LINK)

What is Activated Charcoal Used in?

I'm sure you remember a wave of activated charcoal toothpastes that swept the beauty and personal care scene a few short years ago. It seemed everyone was introducing a fashionably black toothpaste for whitening, brightening and supporting overall oral health.

I have yet to try this in one of my tooth powders, but writing about it has prompted me to add this to my to-do list.

Apart from oral care, you might find activated charcoal a useful ingredient in your

  • Face Masks

  • Face Cleansers

  • Soaps

  • Exfoliating sponges

  • Hair masks

  • Shampoo Bars

  • Deodorants

Do Tell

Have you worked with activated charcoal? What did you use it in and what were the results?

Please share in a comment below.

More Links:

This is a short list of some of the places I visited while researching this— the ‘titles’ are not written out. Each link is instead paired with a short description of the article’s conclusion.

Internal adsorption (LINK)

Ability to Bind salicylic acid (aspirin) (internal use) (LINK)

Activated charcoal may be functional in battling bacterial toxins and aid wound healing (LINK)

Activated charcoal dressing for diabetic foot ulcers (LINK to Chrome Extension PDF file)

For oral use (inconclusive evidence of detoxification used as tooth cleanser) (LINK)

For oral use: no increased erosion of tooth enamel (LINK)

For topical use on skin: inconclusive (LINK to Chrome Extension PDF file)

Inconclusive, not FDA approved, anecdotal (LINK)

Possible benefits for skin (Medical News Today) (LINK)

Short History of activated charcoal (from a supplier of activated charcoal) (LINK)

Below is my book formulation template on how to make your own tooth powders.

Introducing Tutorials

Lise

I’m pretty excited to be able to introduce you to my very first tutorial - right here on the website!

Squee!

If you have been following me for a while, you already know I love working with botanicals of all types for all kinds of things. One increasing interest in recent years has been creating flavour oils. It began with lip balms in mind, but as I started getting more and more into combining ingredients to smell nice as well as taste nice, I kept coming up with even more things I wanted to try.

I’m not even going to mention how long my to-do list is at the moment.

This particular challenge (capturing the flavours of a classic gin and tonic) has taken much longer than I expected (that seems to be a bit of a pattern when I start out thinking I can ‘knock something out relatively quickly’). Many of the initial batches started out well, but then the fragrance faded, or flavour changed, or something else went annoyingly wrong.

Fast forward 3 years and a few more batches than I originally thought were going to be necessary, and finally I could say I was happy with the results.

The star of this tutorial is making the flavour oil (which is super for several different products), but I’ve also created a couple of lip balm formulas to use the flavour oil in: a vegan version and a version featuring beeswax.

Wouldn’t you know the balms also took a bit longer than expected to get right (I’m looking at you vegan waxes), but as it turned out, quite a bit of it was solved when I got the flavour oil right.

Does this sound complicated? Well, before I had figured out how to do it, it was, but when you know how to do it, it’s not that complicated. (Isn’t that true of so many things?)

Are you a little curious about getting busy making your own?

Click the picture below to read more.

PS: The formulas for both of these balms as well as the flavour oil are free for LisaLise Club members. If you think you might want to check out becoming a member, click the picture below.

Herbal Tea: Health and Skincare Inside and Out

Lise

Throughout this summer, I have been enjoying herbal tea as a refreshing all-day cool drink. Almost every herbal tea functions equally well hot or cold. Come to think of it, I can’t recall a single herbal brew I didn’t enjoy equally as an iced tea.

This particular blend has been my go-to during the past months. I happened to serve up a glass to a family member who popped by on a very hot day and it was instant hit. When I offered her some to bring home, the reply was “I thought you’d never ask”.

If you happen to work with botanicals and have a selection of dried herbs in stock, it’s pretty easy to make your own herbal blends. The advantages are multiple as you are getting the (water-soluble) benefits of the botanicals as you enjoy your refreshing drink.

I’ve made quite a few blends over the years and have discovered there are a few things you can do to take your creations to the next level.

Today, I’m sharing a few tips that have worked for me. You might already know some of these, but hopefully there is a bit of inspiration too.

How to Make Your Own Herbal Tea Blends

In my experience, composing an herbal tea is a bit reminiscent of creating a fragrance blend. If you compose a blend of only top notes, it’s going to lack depth and ‘roundness’.

It can make quite a difference to the taste (and herb synergy) if you choose a few ‘background’ herbs to function a bit like a taste-and-fragrance anchor. These may be (super beneficial) herbs that may seem a little boring-tasting on their own, or could be herbs you normally wouldn’t consider using in a blend at all. (Can you tell I’ve experimented quite a bit over the years?)

As an example, here’s are some of the ‘background herbs’ I am using in my current blend

  • Horsetail

  • Red Clover

The ‘middle and top note’ herbs

  • Lemon verbena

  • Wild rose

  • Hibiscus

  • Chamomile

  • Rose

Choosing Proportions

I am very instinctive when making herbal tea blends. Nothing is weighed or measured, but merely mixed into a large bowl in proportions that suit me at that moment. Herbs are chosen from my stock ‘instinctively’ as well. Gazing into the stock cupboard is inspirational for me as I have quite a collection of dried botanicals.

If this sounds a little daunting and you haven’t tried this before, may I suggest using about 1/3 of the blend as ‘background herbs’ and 2/3 with the herbs you want to be dominant in taste.

In the blend above, I am using a proportionately larger amount of chamomile and rose petals as I like these to stand out. The lemon verbena gives these dominant ‘flowery herbs’ a bit of crispness and depth. Hibiscus was added after my first few batches because I wanted a pinker brew. It also adds to the experience if the color of the brew matches the taste.

How to Make an All Day Herbal Brew

To have enough to sip on all day (and serve to lovely guests who happen to pop by), make a potful (I make 1 liter) at a time.

  1. Fill a large tea filter with your chosen amount of herb blend (I generally use about 5-8 grams)

  2. Pour boiling water over the herbs and allow to infuse. While most herbal brews generally take between 5-10 minutes to infuse, I usually infuse between 15-20 minutes.

  3. Sweeten if desired (I generally add a spoon/dipper of raw honey)

  4. Drink some immediately and/or allow to cool and serve over ice with a slice of lemon.

And if you want to get a little fancy, serve up in a stemmed glass.

Enjoy!

Bellow is my latest publication that shows you how to compose your own bi-phase cleansers and make-up removers.

What Makes Colloidal Oatmeal Colloidal?

Lise

This post is the result of numerous extensive research sessions that turned up differing answers, more questions, and a whole lot of interesting information about microns and particle sizes for colloidal oatmeal.

Who could imagine a simple grain could be such a mind-blowing skincare ingredient?

But I'm getting ahead of myself.

Get ready for a bit of a ride as we examine colloidal oatmeal, because there are a few twists and turns along the way.

The Discussion

It was discussion with some colleagues about the production process for making colloidal oatmeal that started this whole thing. Some of the participants were convinced colloidal oatmeal could only be produced via a process that entails boiling the grains in water, drying, and subsequent filtering. Others were convinced making colloidal oatmeal was merely a matter of grinding/milling oats to a certain particle size.

Spoiler alert: Everyone was right.

But before we get into the process of how colloidal oatmeal is made, we need to take a peek at the difference between colloidal oatmeal, ground oats, and oat flour.

Colloidal Oatmeal vs Ground Oats vs Oat Flour

If you grind up a portion of rolled oats (what I show you how to do on this post), your result (unsurprisingly) will be ground oats. A coffee grinder and lots of sifting will get you a fine, powdery result that's great to use as an ingredient, but even loads of sifting and grinding won't get the particle size down far enough to where you can call it colloidal oatmeal.

Go ahead and add your handcrafted ground oats to a powdered facial cleanser, face mask, or soap, but if you incorporate it into an emulsion (say, a lotion), it will in all likelihood result in undesirable lumpy bits that you won't be happy about applying to your skin.

In short: when it comes to texture, ground oats have more limited uses than colloidal oatmeal.

How Oatmeal is Processed

Colloidal oatmeal is made using whole oats and includes the bran, but has a smaller particle size than can be achieved in a home setting (more on that in a minute).

Oat flour is made by first removing the bran and then the milling the oats. By removing the bran, it's possible to achieve a much finer particle size. This is great if you want to add a bit of texturizer to your product, but inconsequential if you want all the documented skin-loving properties that colloidal oatmeal offers.

Without the bran, oats really don't have very much to offer.

So, What's in Oat Bran?

Colloidal oatmeal and ground oatmeal (from whole oats) both include the bran and therefore contain actives such as:

  • Lipids (unsaturated triglycerides that help replenish the skins oils)

  • Beta glucan (moisturising)

  • Avenanthramides (antioxidant unique to oats)

Oatmeal with the bran is anti-inflammatory, helps soothe itchiness, and even offers skin barrier repair.

As oats also contain a small percentage of saponins, they're ideal for gentle cleansing.

The bran is – quite simply – where all the actives are.

Colloidal Oatmeal Confusion

Now that we know the difference between oat flour, colloidal oatmeal, and ground oats, one would think there was nothing more to discuss (or research).

One would think.

But while I was researching colloidal oatmeal, I kept running into this:

The INCI name for colloidal oatmeal is: Avena Sativa (oat) kernel flour

The INCI name for oat flour is: Avena Sativa (oat) kernel flour

Do you see any difference in these INCI names?

I sure don't.

It seems you can't be quite sure of whether or not you are purchasing oat flour or colloidal oatmeal just by looking at the INCI name.

Obviously, more research was in order.

The International Cosmetic Ingredient Dictionary and Handbook defines colloidal oatmeal as “finely ground oatmeal”. The definition does not specify which species of oat is needed/desired/required.

I checked a few places to see what they had to say about colloidal oatmeal. Here are some highlights:

CosmeticsInfo.com writes:

Colloidal Oatmeal is finely ground oatmeal. It is often used to relieve minor skin irritation and itching due to poison ivy or insect bites. It can also be used as a soak, compress or wet dressing. When oatmeal is used in cosmetic and personal care products (rather than OTC skin protectant drug products), it may be called Avena Sativa (Oat) Kernel / Meal.

Oat Cosmetics writes:

Colloidal oatmeal is a natural cosmetic ingredient obtained from Avena sativa (oats). The whole oat grain, including the bran layer, is milled and sieved. This results in a light cream coloured, fine powder. The bran layer of the oat contains a high proportion of natural actives including, oat beta-glucan, avenanthramides, oil and protein, all of which are beneficial for cosmetic use on the skin.

A ‘colloid’ or colloidal suspension is defined as a substance with dispersed insoluble particles suspended throughout.

Aroma Zone describes their colloidal oatmeal as such (Google translated from French):

This powder is called "colloidal" because the fineness of its particles allows it to form a homogeneous suspension in water, like milk, stable for some time.

Particle size: 44 microns

(note the micron mention - we're going to be looking at that in a tic)

I also emailed Formulator Sample Shop's founder Maggie Ghanem to ask if she could explain a bit about about colloidal oatmeal. She was kind enough to provide me with this:

Colloidal Oatmeal is made of finely milled oats from the Avena sativa plant. It consists of sugars, amino acids, lipids and fibers. Colloidal Oats are grounded, boiled and steamed. Oat grains are milled into fine powder that will produce a cosmetic agent that can be used as an addition to baths, powders, and moisturizing creams.

All in all, there's some great information here, but the mention of microns and particle size raised more questions.

We need to get a teensy bit nerdy now, but stick with me and I'll try to make it as entertaining as possible.

Microns, Nanometers, and Colloids

Pictured: the difference between a stable and unstable colloid.

The upper limit size for particles in a colloid is generally defined at 1000 nanometers. That means, each of those little green particles you in the illustration above should be under 1000 nanometers in size.

1000 nanometers is equal to 1 micrometer - commonly called a micron.

How tiny is a micron?

Well, 15 microns is the same as 0.015 mm in size (that's 1.5 hundredths of a millimeter).

Now, remember Aroma Zones product description above? It mentions a particle size of 44 microns. That is the same as a particle size of 0.04 mm (read: four hundredths of a millimeter).

Colloidal Oatmeal Particle Sizes

Now let's look at the particle sizes of colloidal oatmeal, which consists of about 20% starch particles and 80% oat-y particles.

The starch particle size is between 10 - 25 microns.

The oat-y particle size is described as 'below 75 microns'.

I know you're seeing this too.

Something doesn't fit.

The particles in colloidal oatmeal are massive! They have a diameter well above 1000 nanometers.

Colloidal oatmeal particles are too big to be classified as a colloid.

If you want to get completely and utterly technical, colloidal oatmeal isn't even colloidal.

This was pretty much my reaction to this information.

But, instead of panicking (as would be quite understandable), I decided to keep digging around and asking more questions.

And there was still the matter of production processes – which method was correct?

Finally, with the help of a very patient and gracious expert in the production of colloidal oatmeal, I found the answer (he has a special mention at the bottom of this post).

Production Processes for Colloidal Oatmeal

The Dry Way: If you have the right equipment (and no, we're not talking about a pricey super duper kitchen machine), it is indeed possible to dry-produce colloidal oatmeal. The main challenge is the natural fat content of oats (about 7%) which tends to gunk up the 75 micron sieve it has to pass through, but as long as at least 80% of the oats pass through the sieve, it's OK to label the packet 'colloidal oatmeal'. Granted, this method takes some real advanced milling equipment that not many have, but it is indeed do-able.

The Wet Way: Producers who employ 'the wet way' of making colloidal oatmeal will use a process called pre-solubilising the oat starch. This means they soak the oats (and do other magic secret proprietary things) to separate the oaty bits from the starchy bits. This process changes the structure of the starch and allows the producer to achieve an acceptable colloidal oatmeal particle size.

So, it turned out that everyone in the discussion was right.

Don't you just love it when that happens?

But wait!

There is still an unanswered question.

The INCI Conundrum

Since the INCI name is identical on both oat flour and colloidal oatmeal, how can we tell if we are buying colloidal oatmeal or oat flour?

Here's the kicker.

I don't have the answer (and still don't since this post went live in 2017!)

I can only offer this advice: buy from a trusted supplier and ask them. Be kind, but be persistent until you get a satisfactory answer. Be patient. It could take a few weeks, because sometimes the distributor (not being the producer) won't be able to answer you until they do a bit of digging and asking on their own first.

Meantime you will get the bran's skin benefits using your own handcrafted ground oats in any of the following products without having to worry about lumpiness:

  • Bath bombs

  • Powdered face cleansers

  • Bath salt blends

  • Face (or hand) masks

To illustrate the difference between ground oats and colloidal oatmeal I placed 1 gram of each in separate containers, then added 15 grams of water to each container. I swished the jars to disperse the oats and then let the jars stand untouched for about 15 minutes. Here is the result. It’s easy to imagine why a cream or lotion would get a bit lumpy if handcrafted ground oats are added instead of colloidal oatmeal.

Do Tell

Do you use colloidal oatmeal, ground oats or oat flour in your products?

More About Colloids, Avenathramide, and Oatmeal for Skincare

Colloidal oatmeal; history chemistry and clinical properties (LINK)

What is a colloidal oatmeal: Cosmetics Business (LINK)

Anti inflammatory activities of colloidal oatmeal (LINK)

Colloidal oatmeal formulations as adjunct treatments in atopic dermatitis (LINK)

Cosmetics and Toiletries: Colloidal Oat flour for skin and hair (LINK)

Colloidal Oatmeal: history, chemistry and clinical properties (LINK)

Safety Assessment of Oat derived ingredients as used in Cosmetics (LINK)

Scientific American: Creating your own colloid (LINK)

Avenanthramides (LINK)

Biological Activities, Health Benefits, and Therapeutic Properties of Avenanthramides: From Skin protections prevention and treatment of cerebrovascular diseases (LINK)

Particle Size: Wikipedia (LINK)

Micrometer Conversion scale (LINK)

A very special thanks to Cark Maunsell at Oat Services for his kind assistance and patience with all of my questions.

Want to make a quick and easy cleanser with oatmeal? The formula below (from the Working with Shea Butter book) might be fun to try.

DIY Microdermabrasion - But Proceed With Caution

Lise

Contrary to dermabrasion (which requires a professional dermatologist), microdermabrasion literally 'skims the surface' and can either be done by a professional or by you. Microdermabrasion can even be done effectively with ingredients you probably already have in your kitchen cupboard.

Today, we're going to do our own microdermabrasion. The best part? It's hardly going to cost a thing! The worst part? It comes with a few precautionary warnings.

'Sanding off' a Few Layers

Microdermabrasion works by removing a few of the topmost layers of skin (stratum corneum).

It could be described as a 'pumped-up' version of exfoliating that stimulates cell growth and makes the skin particularly receptive to moisturisers.

Be sure you are stocked up on face oil and soothing skin mists/hydrosols (or moisturising sheet masks) before you begin.

Microdermabrasion can be done regularly and is beneficial for most skin types.

However... done incorrectly (or too often), the skin can become overly sensitive and damaged. Also, removing layers of skin means it is going to need extra sun protection afterwards.

NOTE: It's optimal to stay completely out of the sun for a few days after microdermabrasion.

Microdermabrasion Isn't For Everyone

Not all skin types benefit from microdermabrasion! If you have sensitive skin or are struggling with acne, ask a professional about microdermabrasion before trying this. Also, if you have a tendency to rosacea, microdermabrasion is NOT recommended for you.

And now that I've given you a few precautionary warnings, let's get busy!

Everything You Need Right At Home

The ingredients for this procedure are as common as you please, and probably already sitting in your kitchen cupboard – aloe vera juice (or gel) and baking soda (INCI: sodium bicarbonate).

Used correctly, baking soda is effective at microdermabrasion. Paired with aloe gel, application is easier and the skin is less likely to become irritated.

Now, before you start scrubbing away at your face and congratulating yourself on saving a pile of money at the spa, keep in mind that it is far too easy to irritate and damage the skin with this treatment, so be nice to your fabulous face and GO SLOW – don't overdo it!

(OK, that's the last warning I'm going to throw at you - promise)

The LisaLise Microdermabrasion Method

  1. Wash your face with your preferred cleanser

  2. Place 2 teaspoons of aloe vera gel* (or juice) in a small bowl

  3. Mix approximately half teaspoon of sodium bicarbonate into the aloe vera gel until you have a smooth paste

  4. Apply the paste to face and massage EVER SO GENTLY with an EVER SO LIGHT TOUCH using small circular motions. Move slowly, working outwards from the nose. Avoid the eye area.

  5. Stop massaging after about 60 seconds.

  6. Remove the paste by rinsing thoroughly. Use only water - do not use a wet cloth to remove. I'm sure you've seen the commercials where the lady splashes water on her face to rinse and you never see where all the extra droplets go or how big a mess the bathroom is afterwards. Rinse like that.

  7. Let your skin air dry.

* you could replace this with a hydrosol of your choice

Proceed immediately to

The LisaLise Secret-To-Microdermabrasion-Success-Skin-Loving-Moisture-Drench-Routine

  1. Mist your face generously with hydrosol

  2. Apply a moisturising sheet mask and let sit for 5-15 minutes (OR apply a generous dollop of (water based/gel) face serum and massage the face gently for a few minutes)

  3. Remove the sheet mask

  4. Pat the skin lightly - the gel/serum from the mask should be fully absorbed

  5. Apply 12-15 drops of face oil and gently massage into the skin

  6. Finish with a final mist of hydrosol

Followup Moisturising

In the following days, your skin is going to be thirsting for more skin-drenching goodness and will therefore thrive on repeat performances of the LisaLise Secret-To-Microdermabrasion-Success-Skin-Loving Moisture Drench Routine (I really must figure out a shorter name for this procedure).

Enjoy!

How Often

This DIY microdermabrasion method can be done every 6-8 weeks for a total of 3 sessions/times. After 3 sessions, take a 3-4 month rest period before starting again.

Do Tell

Have you ever tried DIY microdermabrasion? Which method did you use? Did it work well for you?

Below: this beginner friendly e-book (also available in Spanish) has a complete section on fresh food face masks.